- Have any questions?
- +88 01799-646582
- hello@cutoutway.com
How to remove an object from a photo in photoshop| GIMP | Best tips and tricks for beginners

How to create a ghost mannequin effect in adobe photoshop | Cut Out Way
October 29, 2021
How to remove clothing wrinkles in photoshop | Best photo retouching service for cloathing
November 7, 2021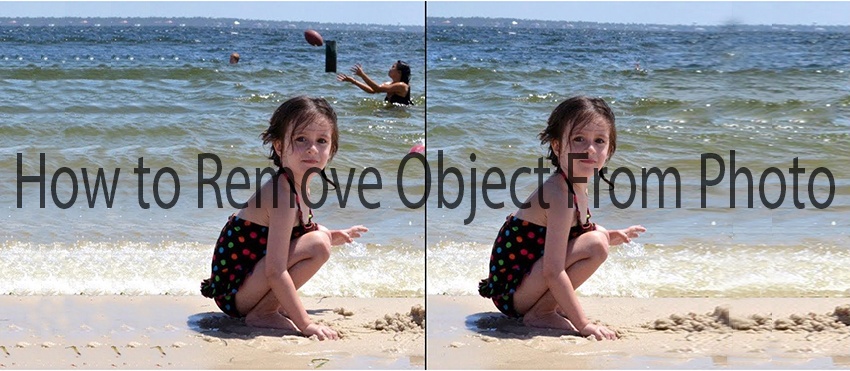
How to remove an object from a photo in photoshop| GIMP|
Best tips and tricks for beginners
How to remove an object from a photo in Photoshop-Scenery and photo bring product or life an exciting value. It adds to your website a different look and feel. For increasing your brand value or aesthetic, sometimes, images take a vast role in the marketplaces. With objects image for product photos, it’s necessary to remove Objects appropriately for brand awareness.
In the following tutorial, I will quickly show you how to remove an object from a photo in Photoshop.
In this tutorial
- How to remove an object from a photo in photoshop
- How can I erase the background from a picture using Photoshop?
- What is the best tool to use in Photoshop to remove an object?
- How do I remove a watermark from an image?
- Remove wrinkles from clothing in photoshop
- Remove white background from an image?
- How to use GIMP to remove an object from a scene
How to remove an object from a photo in photoshop
Photoshop offers the most superior and helpful service, so we’ll show you today how photoshop removes an object from a photo background and how fantastic looking the image is? We cover
here
- How to remove a person or object from the background using content-aware fill.
- How do I remove watermark from an image using clone stamp tools, healing brush tools?
How to remove an object from a background using content-aware fill?
The easiest and quickest way to make vanished unwanted items from an image is to use content-aware fill. The methods work great if there have too many objects on the side of the image.
Now I’m going to show step by step how to remove background from image photoshop using content-aware fill.
Step-1
Using lasso tools, draw a rough selection around images that you want to remove. Remember that which part of the image you want to preserve in the selection.
Step-2
Choose Edit>Fill or type shif+F5 (FN+SHIFT+F5 from Mac laptop) to bring up the fill dialogue box.
Step-3
After choosing the dialogue box, choose content-aware and make sure you check the color before as default. For 100% default color, you need to click “D”. Then click ok.
You see that your unwanted elements vanished.
After removing the reflection, you see that there have some pixels still as a reflection. It would help if you cleaned up entirely that the person has never seen in the photo.
Step-4
Use clone stamps or Healing brush tools to smooth out any blemishes or reflections.
Clone stamps tools and spot healing brush tools work in the same way. Using this tool, you can blemish any spot or dust by clicking ALT and then art with the tools over the image area where you need to fix the error.
If the clone stamp tools have missed something, healing brush tools blend and pixel to smooth seamless effect.
How do I remove watermark from an image using clone stamp tools, healing brush tools?
If your background is complex to use content-aware fill methods, you can use clone stamp tools or healing brush tools to remove unwanted elements or watermarks. You can also use the curves dialogue box to remove unwanted elements in pieces.
You can remove a watermark from a damaged image by using clone stamp tools or healing brush tools. You could use the methods for an instant good result and remove the watermark from the photo.
In this sector, clone stamp tools or healing brush tools can help remove or blemish your product photo and set up your image in a new background.
Now I will discuss how to remove watermarks or blemishes by using clone stamps tools or healing brush tools.
Step:1
Using magic wand tools set to tolerance around 10, Select the Object and easily remove the object. Hold down the SHIFT key and click the magic wand tools. Select the area in which you need to remove an object from the background. Remember which area you need to remove the object; you need to select this area.
Step-2
Open the dialogue box selecting image>Adjustment>Curves from the menu bar. Or typing CTRL+M (Command+ M from Mac)
Step-3
From the curves dialogue box, click and press the middle of the curves line until the area of the mark cover the watermark area. You should retain the same contrast and color around the products.
Now click ok.
Step 4:
Bring the product contrast adjustments and more soften use healing brush tools or clone stamp tools. Repeat the above place to remove the extra portion or watermark.
How can I erase the background from a picture using Photoshop?
Erasing or deleting the background also makes your image easy and helps you remove an object from an image. Adobe photoshop pen tools can remove background by using the clipping path service. Only pen tools can give you a 100% handmade clipping path for your clients. There are so many tools in photoshop like background eraser tools, magic wand tools, quick selection tools.
Today I’m to show you the best tool in Photoshop to erase or remove background from an image?
Photoshop clipping path service can help you to erase the background. Removing the background makes it easy when people use photoshop pen tools to delete the background. Using pen tools step by step today, we learn how easily we can easily remove background from an image.
Step-1
Open an image with adobe photoshop and select the pen tools for the draw path. To select pen tools, you can press the “P” button for a shortcut.
Step-2
After selecting pen tools, draw a path around the image until it’s not covered up a complete image.
Step-3
Now your clipping path is done, and, in this step, you need to select the path by pressing CTRL+ ENTER and create a new layer above the background.
Step-4
After completing step 3, now select a solid color and change your background white or wanting color. Save your image JPEG, PNG, TIFF, PSD, or which format you need.
Remove wrinkles from clothing in photoshop.
Did you know that removing wrinkles from clothing products in photoshop makes image details and overlooked? Sometimes you notice some wrinkles or ugly wrinkles on your clothing products, and it’s a hamper for your online business if you want to post the cloth on any online platform.
Luckily there are several ways to remove wrinkles and keep clothing as good as new!
In this article, I’ll show you the advanced techniques for quick and easy.
Let’s started
Why do you need to remove wrinkles from clothes in photoshop?
Wrinkles mean distracting
Most people want their products to have no wrinkles or dust, so it’s essential to sell your product on the amazon store and reminds that if there are any wrinkles or not.
Wrinkles can have such a negative impact. Viewers will get fixed on the flaw instead of viewing what they love about your photo.
If you have a professional mind, you must get a remove wrinkles solution because you often see the difference between wrinkle remove photo and details photo.
Wrinkle remove from clothes using photoshop.
There are so many tools you can use for wrinkles to remove in photoshop. But one of the most popular options is healing brush tools.
There are three healing tools in photoshop, Healing brush tools, Spot healing brush tools, and patch tools. Each of these three tools can use remove wrinkle remove or iron your clothes with photoshop.
When your image has more wrinkle or unwanted elements, healing brush tools can help you remove this object or wrinkle. Photoshop tools help you to remove sample pixels from the area’s surrounding in the image. This way, retouching service blends nearby elements.
Now the spot healing brush tools will automatically care for your pixel. Healing brush tools automatically care about your pixel. You need to set the size of your brush and its hardness. Photoshop takes care of the rest.
Removing wrinkles from products is the best option for fabrics, and you can see that there has a texture in the maximum fabrics, and healing brush tools can replace your texture and make the product smoother.
You can choose a healing type. You have three options: Content>Aware, Create texture, and proximity match.
Healing brush tools work the same way. Remember that before starting, hold the Alt key and then click the area you need to remove the wrinkle.
Finally, patch tools draw a selection around the area of wrinkle you want to heal, then drag it towards the pixel you want to source.
The patch tools allow you fast results and cover a large area with each retouch. Remember that never do-over; if your area is too big, then patch tools can’t work correctly, and you need to find the right tools.
Remove wrinkles from clothing in photoshop: Final touch
Using this tool properly now, you can do this confidently remove wrinkles of any type-just with a few quick edits in photoshop.
I recommended you or your clients/model do a bit of ironing dress before a photoshoot. Save time and money.
Next time you need to remove wrinkles from clothing in photoshop, this technique can help you.
How to use GIMP to remove an object from a scene
If you didn’t know how to use photoshop and control this, you could use GIMP to edit your photo.
Now I’m going to show you how GIMP works for your image and how using this, you can remove grab or fuzzy from your image background.
Step-1
Open your image with GIMP, which you installed before. Select the fuzzy select tools from the left menu bar of the application and click on which area has more objects or grab and need to remove the object from the image.

Step-2
Continue clicking with the fuzzy select tools and select all unwanted areas. Use zooms tools to see appropriately where the object has and where unwanted elements have. You can clean the edge as possible as you select the foreground object in your image.

Step-3
Once you are finished, select the object including all edges, then choose Select>Remove holes from the menu option.
You should now have a clean selection

Step-4
Use the clone tools to remove unwanted elements or objects. Like photoshop, GIMP’s clone will come with a pixel from the back part of the image and remove your unwanted elements. GIMP gives you the desired image which you find.

Keep cleaning background using GIMP and hold down CTRL (Command on a Mac)
Continue this process until your elements are not removed.
Step-5
Use heals brush tools to smooth out edges; you need to deselect your selection by choosing select>None from the drop-down menu or press SHIFT+CTRL+A (SHIFT+COMMAND+A) for mac. Then select heal tools from the left menu bar.
Work carefully and smoothly as your image looks that there has been no portion in the image before.
Conclusion
Photo editing has so many processes, and you have to know which processes are used for which purposes. In this tutorial, I teach you how easily you can remove an object from a photo using GIMP and adobe photoshop. Try this way and hope you will get the solution. For any queries, please feel free to contact us.

